ติดตั้ง Flutter และ Android SDK แล้วเริ่มสร้างแอพ
ตอนนี้การพัฒนาแอพมือถือ ถือว่าเป็นเรื่องที่มีความสะดวกสบายมากขึ้น โดยในยุคนี้มี เฟรมเวิร์คดีๆเพียบเลย แต่ละอันก็ต่างมีการทำงานที่มีประสิทธิภาพและระบบความปลอดภัยดี รวมถึงเป็นมิตรกับผู้ใช้และผู้พัฒนาอีกด้วย ทำให้ไม่น่าแปลกใจที่สมัยนี้ใครๆต่างก็ฝึกพัฒนาแอพกันเยอะ เพียงคุณมีคอมหรือแลปทอปเท่านั้น
บทความนี้จะขอพุดถึงการเริ่มใช้งานแอพเฟรมเวิร์คตัวหนึ่งที่มาแรงและผู้พัฒนาคือ Google นั่นก็คือ Flutter นี่เอง โดยเจ้า Flutter นี่เป็น UI เฟรมเวิร์ค แบบ Open Source ที่ Google เริ่มปล่อยออกมาเมื่อปี 2017 นี่เอง การพัฒนาแอพใช้ภาษา Dart สามารถรันได้บนหลาย OS เลย บทความนี้จะขอยกตัวอย่างการติดตั้ง Flutter บน windows 10 ละกันนะ (เนื่องจากผู้เขียนใช้อยู่) เพื่อไม่ให้เสียเวลา เรามาอยู่ Required Spectification ของคอมที่จะลงก่อนเลย
| Item | requirement |
|---|---|
| OS | Windows 7 ขึ้นไป, สถาปัตยกรรมชนิด 64 bit หรือ x86-64 based |
| Disk Space | 1.32 GB ขึ้นไป (ไม่รวม IDE/tools) |
| Tools | Windows PowerShell 5.0 ขึ้นไป, Git เวอร์ชั่น 2 ขึ้นไป ติดตั้งให้เรียบร้อยก่อนลง Flutter |
ขั้นตอนที่เราจะทำต่อไปนี้ จะเริ่มจากการติดตั้ง Software ต่างๆ จนไปถึง เปิดแอพ Flutter ได้สำเร็จ ขออธิบายเรียงตามลำดับขั้นตอนดังนี้
- ติดตั้ง Flutter
- ติดตั้ง Android Studio
- Android Toolchain
- สร้าง Android Virtual Device (AVD)
- ติดตั้ง VS Code
- สร้างโปรเจค Flutter และ build บน AVD
ติดตั้ง Flutter
เมื่อเครื่องพร้อม ให้เรา Download ไฟล์ ที่นี่

เมื่อดาวน์โหลดมาแล้ว ให้ทำตามขั้นตอนต่อไปนี้
1.)แตกไฟล์ที่ดาวน์โหลด แล้วเข้าไปในโฟลเดอร์เพื่อเอาไฟล์ทั้งหมดออกมา (Ctrl+x ก็ได้)
2.)สร้างโฟลเดอร์ตาม path แบบนี้ เช่น C:\src\flutter แล้วเอาไฟล์ที่ได้ไปวาง (ให้สร้าง path ใหม่ ห้ามวางใน C:\Program Files\)
Tip : ถ้าไม่อยากดาวน์โหลดจากหน้าเว็บ ก็เปิด Windows PowerShell แล้วใส่คำสั่งนี้แทน
git clone https://github.com/flutter/flutter.git -b stable
3.)กดปุ่ม Start ไปที่ช่อง search หรือถ้าไม่มีก็เข้า Settings > ใส่ env ที่ช่อง search > เลือก Edit The System Environment Variables ไปที่ Advanced กดปุ่ม Environment Variables
4.)ดูตรง User variables คลิกที่ Path แล้วกดปุ่ม Edit… จากนั้น กดปุ่ม New
5.)ไปที่โฟลเดอร์ตามข้อ 2 กดเข้าไปจนถึง flutter\bin แล้วก็อป path มาวาง แล้วกด OK เท่านี้ก้เรียบร้อยสำหรับการ set up path
6.)เปิด Windows PowerShell ใส่คำสั่ง
C:\src\flutter>flutter doctor
7.)ตัว command จะเช็คสถานะการติดตั้ง Flutter ให้ แล้วจะพ่นข้อความออกประมานนี้
Downloading Material fonts...                                       0.7s
Downloading Gradle Wrapper...                                       0.3s
Downloading package sky_engine...                                   0.3s
Downloading flutter_patched_sdk tools...                            0.9s
Downloading flutter_patched_sdk_product tools...                    0.6s
Downloading windows-x64 tools...                                    1.8s
Downloading windows-x64/font-subset tools...                        0.4s
Downloading android-arm-profile/windows-x64 tools...                0.3s
Downloading android-arm-release/windows-x64 tools...                0.3s
Downloading android-arm64-profile/windows-x64 tools...              0.3s
Downloading android-arm64-release/windows-x64 tools...              0.3s
Downloading android-x64-profile/windows-x64 tools...                0.3s
Downloading android-x64-release/windows-x64 tools...                0.3s
Doctor summary (to see all details, run flutter doctor -v):
[✓] Flutter (Channel stable, 1.22.5, on Microsoft Windows [Version 10.0.18363.1316], locale th-TH)
[✗] Android toolchain - develop for Android devices
    ✗ Unable to locate Android SDK.
      Install Android Studio from: https://developer.android.com/studio/index.html
      On first launch it will assist you in installing the Android SDK components.
      (or visit https://flutter.dev/docs/get-started/install/windows#android-setup for detailed instructions).
      If the Android SDK has been installed to a custom location, set ANDROID_SDK_ROOT to that location.
      You may also want to add it to your PATH environment variable.

[!] Android Studio (not installed)
[!] VS Code (version 1.52.1)
    ✗ Flutter extension not installed; install from
      https://marketplace.visualstudio.com/items?itemName=Dart-Code.flutter
[!] Connected device
    ! No devices available

! Doctor found issues in 4 categories.
แปลความได้ว่า ตอนนี้มีการติดตั้ง Flutter แล้ว แต่ยังไม่มีการติดตั้ง Android SDK (Android Toolchain), Android Studio, VS Code และสร้าง Android Virtual Device หรือ AVD (Connected device) ซึ่งต่อไปเราจะทำการติดตั้ง Android Studio ลงในเครื่องก่อนเพื่อใช้งาน Android Emulator เปิดอุปกรณ์ Android จำลองขึ้นมา
ติดตั้ง Android Studio
สามารถเข้าไปดาวน์โหลดไฟล์ได้ที่นี่


เราวางแผนเอาไว้ว่าจะใช้ VS Code ในการพัฒนาแอพ ในที่นี้จึงไม่ตั้งค่า Android Studio แต่จะใช้แค่ Android Emulator แต่ก่อนอื่นต้องติดตั้ง Android SDK และยอมรับเงื่อนไขของ Android License เสียก่อน
Android Toolchain
แบ่งขั้นตอนออกมาเป็น 2 ส่วนคือ ส่วนติดตั้ง Android SDK สำหรับเป็น Platform ที่บรรจุ Library ต่างๆที่ใช้พัฒนาแอพ Flutter และส่วนติดตั้ง Android License ทำให้ machine ยอมรับเงื่อนไขของ Android
Android SDK
วิธีการตั้งค่า
เปิด Android Studio แล้ว ไปที่ Configure > SDK Manager
ตรง Appearance & Behavior กดที่ System Settings > Android SDK
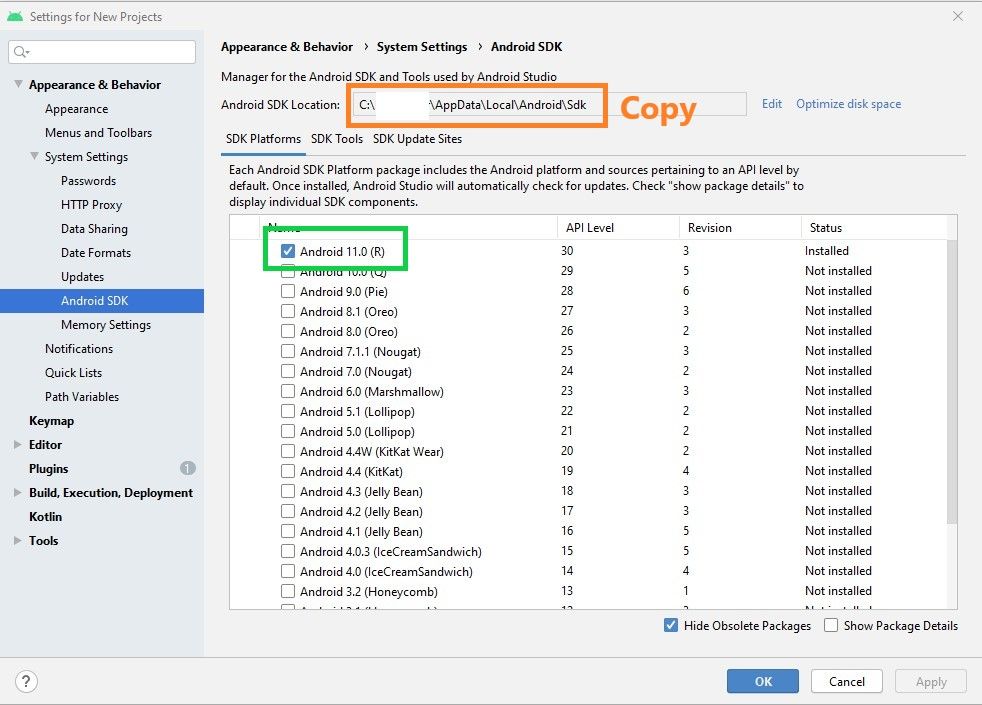
เลือกเวอร์ชั่นที่ต้องการ โดยคลิกที่ Check Box
Copy path ตรง Android SDK Location เอาไว้
ตรง Plugins ให้หาปลั๊กอินที่ชื่อ Flutter แล้วกด Install
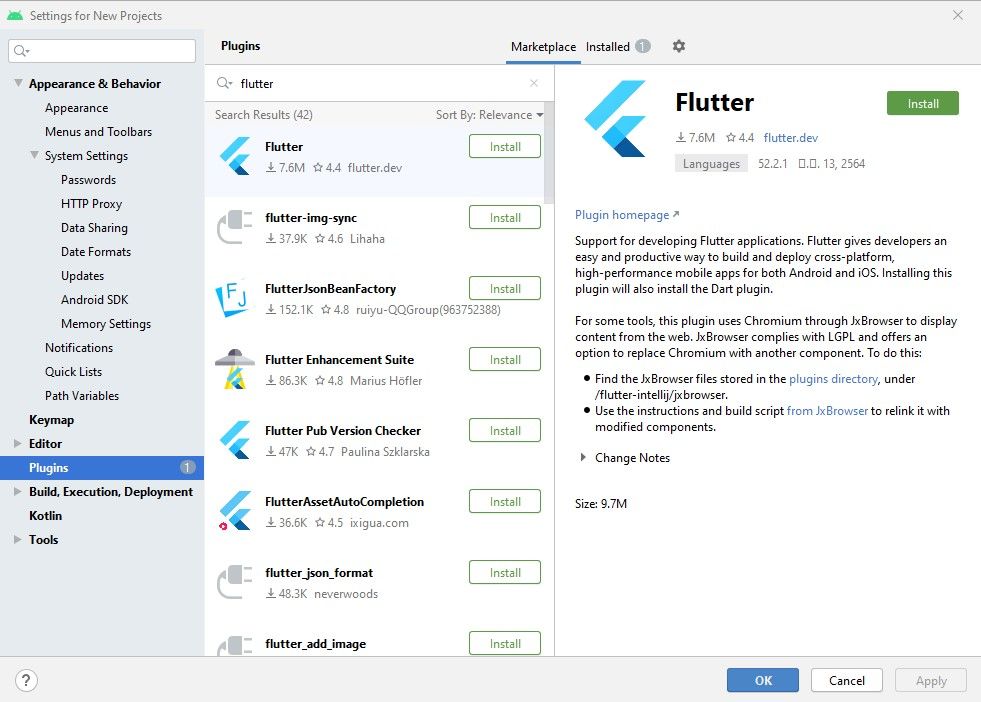
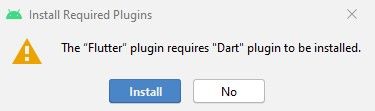
โปรแกรมจะแจ้งว่า ปลั้กอิน Flutter ต้องการให้เราลง Dart ด้วย ก็กด Install ไป
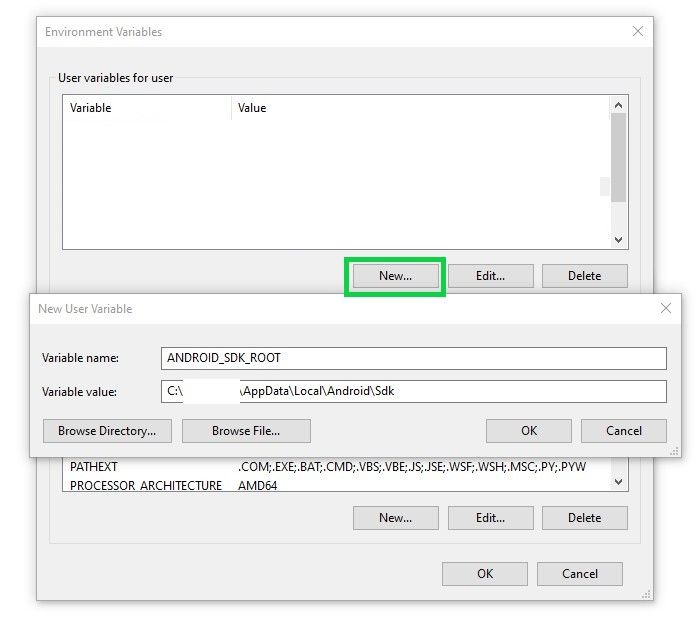
เปิดโปรแกรม Edit The System Environment Variables ขึ้นมา ไปที่ Advanced กดปุ่ม Environment Variables
ตรง User variables ถ้าหากยังไม่มีการเพิ่ม path ของ Android SDK ให้กด New
ตรง Variable name ใส่ ANDROID_SDK_ROOT และ ตรง Variable value ใส่ path ที่ copy มาจาก Android SDK Location เสร็จแล้วกด OK
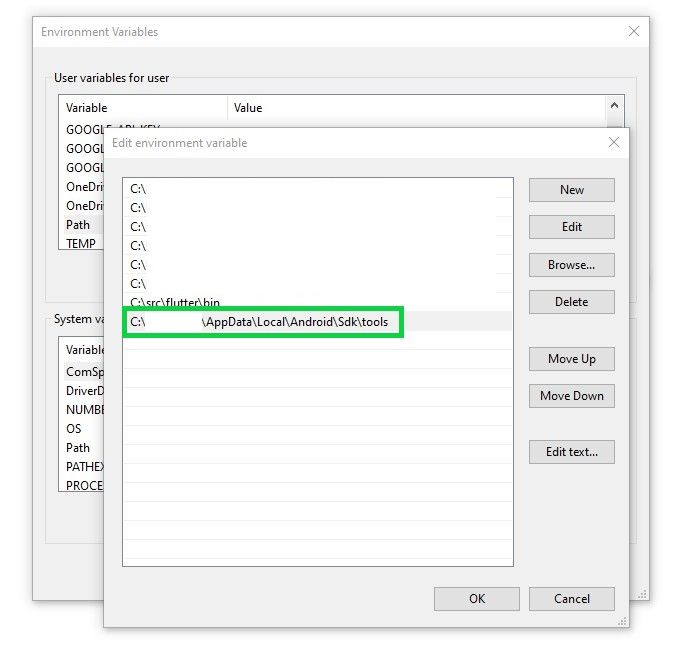
ตรง User variables คลิกที่ Path แล้วกดปุ่ม Edit
วาง path ที่ copy มาจาก Android SDK Location สามอัน
อันแรก พิมพ์ \tools ต่อท้าย
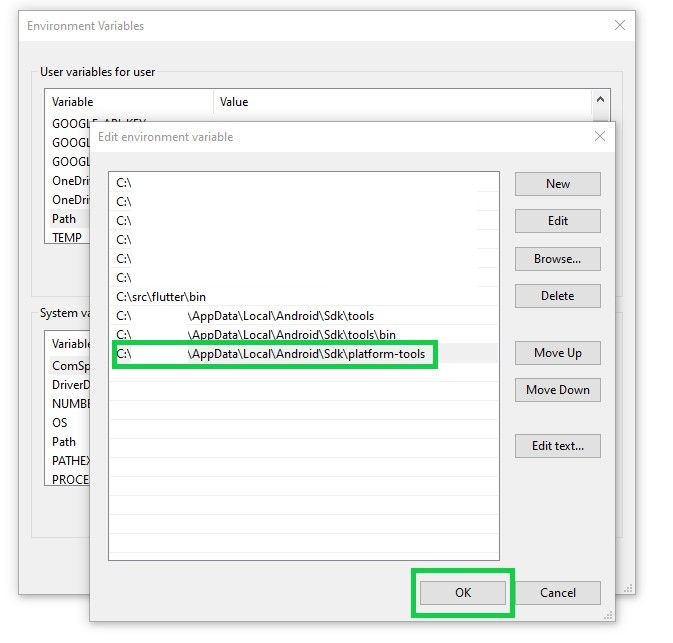
อันที่สอง พิมพ์ \tools\bin ต่อท้าย

อันสุดท้าย พิมพ์ \platform-tools ต่อท้าย แล้วกด OK
เมื่อตั้งค่าเสร็จแล้ว ลองเช็คสถานะจากคำสั่ง flutter doctor อีกครั้ง จะได้สถานะแบบนี้
Doctor summary (to see all details, run flutter doctor -v):
[✓] Flutter (Channel stable, 1.22.5, on Microsoft Windows [Version 10.0.18363.1316], locale th-TH)
[!] Android toolchain - develop for Android devices (Android SDK version 30.0.3)
    ✗ Android licenses not accepted.  To resolve this, run: flutter doctor --android-licenses
[!] Android Studio (version 4.1.0)
    ✗ Flutter plugin not installed; this adds Flutter specific functionality.
    ✗ Dart plugin not installed; this adds Dart specific functionality.
[!] VS Code (version 1.52.1)
    ✗ Flutter extension not installed; install from
      https://marketplace.visualstudio.com/items?itemName=Dart-Code.flutter
[!] Connected device
    ! No devices available
มีการลง Android SDK แล้วแต่ยังไม่มี License (Android licenses not accepted) มาติดตั้งกันต่อเลยฮะ
ลง Android License
เราต้องลง License เพื่อให้เครื่องเราสามารถเข้าถึง Android ได้ โดยต้องติดตั้งเพื่อยอมรับเงื่อนไขของ Android License ทำได้โดยการใช้คำสั่ง
flutter doctor --android-licenses
ระบบจะพ่นข้อความออกมาเยอะมากๆ โดยให้เรากด Y (Yes) ไปทุกๆครั้งที่มีคำถาม
เมื่อเสร็จแล้ว ให้เช็คการติดตั้งอีกที โดยใส่คำสั่ง flutter doctor
จะมีอัพเดทการติดตั้งออกมาเป็นแบบนี้
Doctor summary (to see all details, run flutter doctor -v):
[✓] Flutter (Channel stable, 1.22.5, on Microsoft Windows [Version 10.0.18363.1316], locale th-TH)

[✓] Android toolchain - develop for Android devices (Android SDK version 30.0.3)
[!] Android Studio (version 4.1.0)
    ✗ Flutter plugin not installed; this adds Flutter specific functionality.
    ✗ Dart plugin not installed; this adds Dart specific functionality.
[!] VS Code (version 1.52.1)
    ✗ Flutter extension not installed; install from
      https://marketplace.visualstudio.com/items?itemName=Dart-Code.flutter
[!] Connected device
    ! No devices available

! Doctor found issues in 3 categories.
การติดตั้ง License เป็นอันเรียบร้อย ขั้นตอนต่อไป ทำการตั้งค่าเพื่อสร้าง AVD เพื่อใช้ดป็นเครื่องจำลอง (Emulator) กันครับ
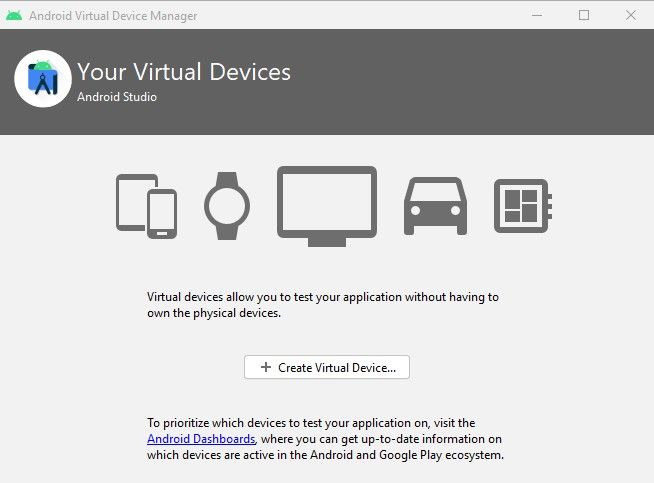
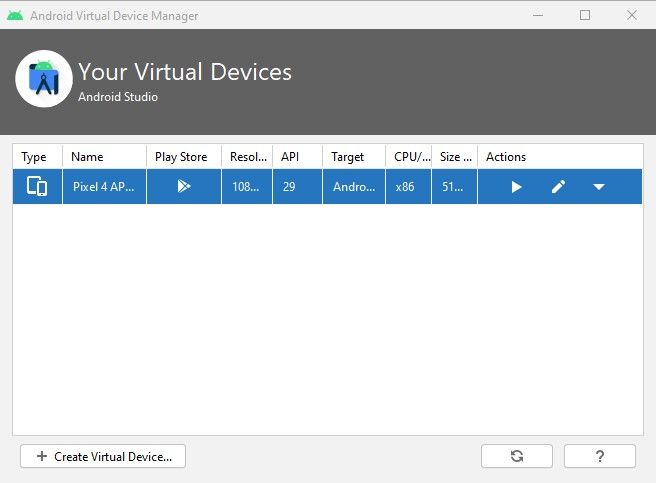
สร้าง Android Virtual Device (AVD)
เป็นการติดตั้งเครื่องจำลอง Android ใช้เวลาที่เราจะเทสต์รันแอพของเรานั่นเองครับ
ขั้นตอนการตั้งค่าและเปิดใช้งาน
เปิด Android Studio แล้ว แล้วไปที่ Configure > AVD Manager
คลิกที่ Create Virtual Device
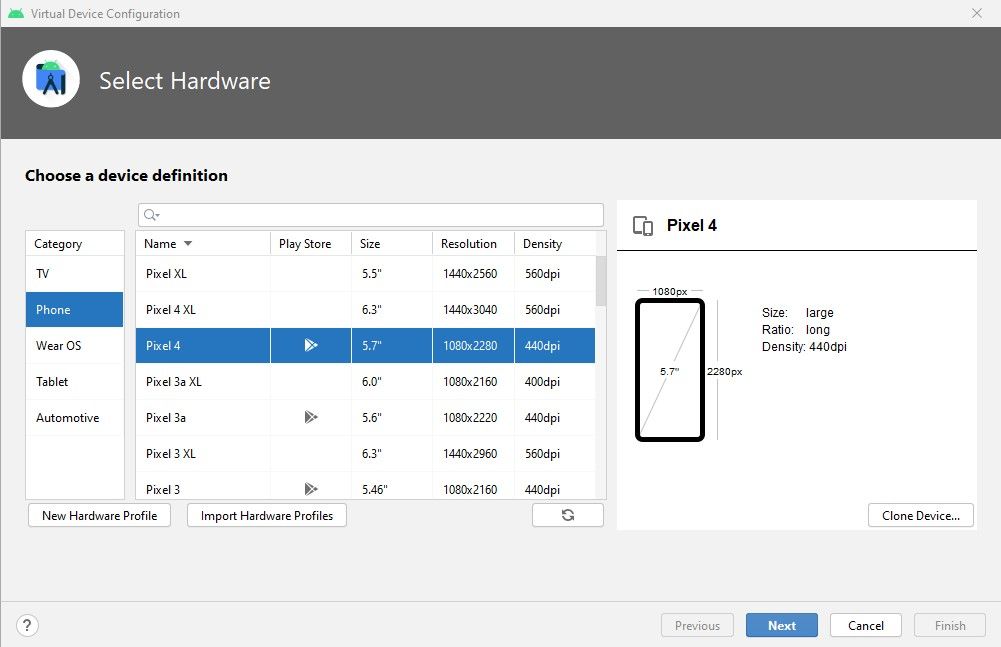
ใน Category เลือก Phone แล้วเลือก pixel ที่ต้องการ จากนั้นกด Next
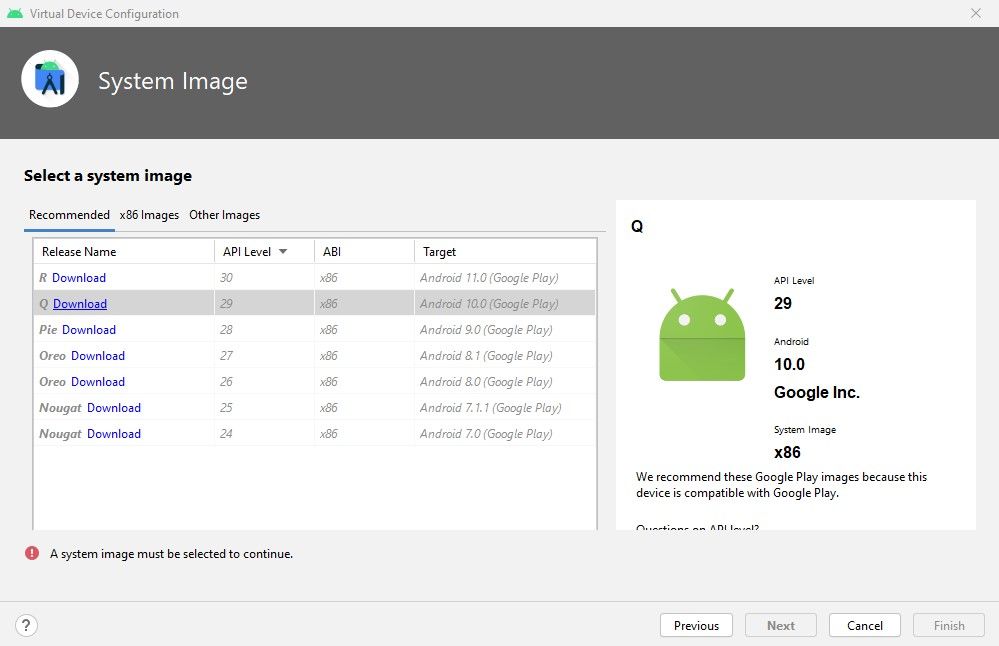
คลิก Download รุ่นระบบที่ต้องการ จากนั้นกด Next
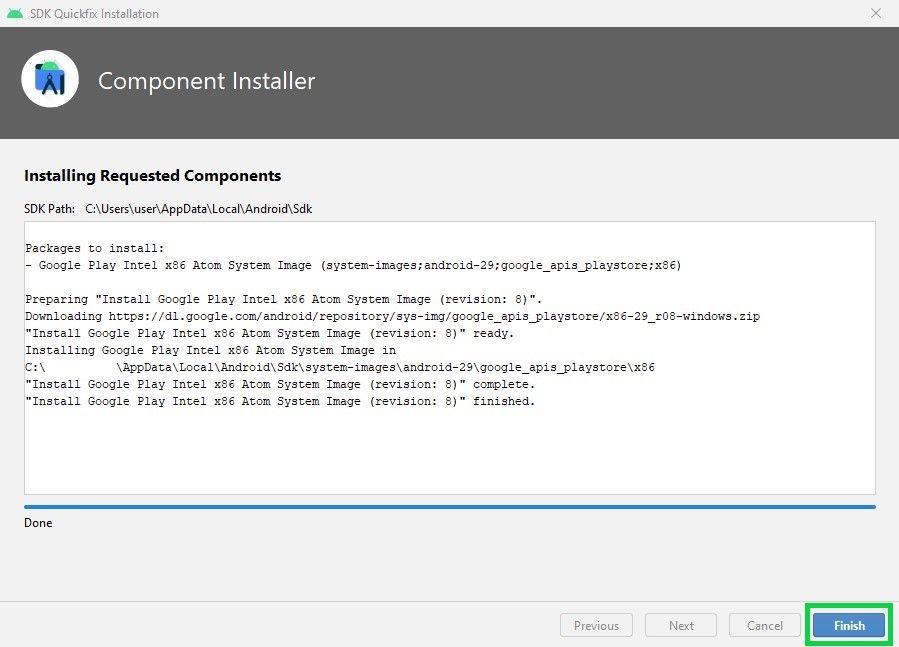
รอการติดตั้งจนเสร็จ แล้วกดปุ่ม Finish
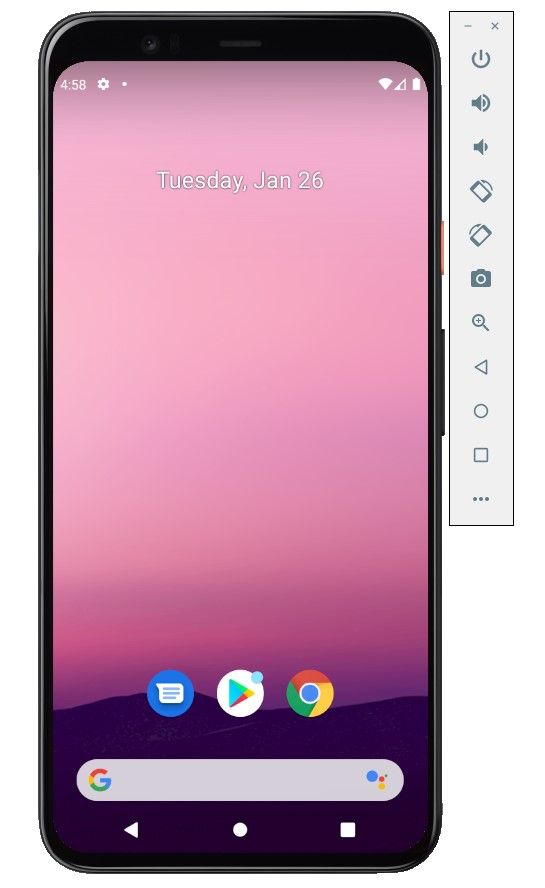
ถึงขั้นตอนนี้ เราสามารถกดใช้งานเครื่องจำลองได้แล้ว โดยกดเครื่องหมายสามเหลี่ยมที่อยู่ตรง Actions
เช็คสถานะกันหน่อยซิ ที่หน้าจอ terminal ใช้คำสั่ง flutter doctor อีกที ดูดิเป็นไง
Doctor summary (to see all details, run flutter doctor -v):
[✓] Flutter (Channel stable, 1.22.5, on Microsoft Windows [Version 10.0.18363.1316], locale th-TH)

[✓] Android toolchain - develop for Android devices (Android SDK version 30.0.3)
[!] Android Studio (version 4.1.0)
    ✗ Flutter plugin not installed; this adds Flutter specific functionality.
    ✗ Dart plugin not installed; this adds Dart specific functionality.
[!] VS Code (version 1.52.1)
    ✗ Flutter extension not installed; install from
      https://marketplace.visualstudio.com/items?itemName=Dart-Code.flutter
[✓] Connected device (1 available)
แบบนี้แปลว่า สร้างและเชื่อมต่อ AVD เรียบร้อย
ติดตั้ง VS Code

ทำการติดตั้ง VS Code เพื่อใช้เป็น Code Editor
เมื่อติดตั้งเสร็จแล้ว ลองใช้คำสั่ง flutter doctor เพื่อเช็คสถานะการติดตั้งอีกครั้ง
Doctor summary (to see all details, run flutter doctor -v):
[✓] Flutter (Channel stable, 1.22.5, on Microsoft Windows [Version 10.0.18363.1316], locale th-TH)

[✓] Android toolchain - develop for Android devices (Android SDK version 30.0.3)
[!] Android Studio (version 4.1.0)
    ✗ Flutter plugin not installed; this adds Flutter specific functionality.
    ✗ Dart plugin not installed; this adds Dart specific functionality.
[✓] VS Code (version 1.52.1)
[✓] Connected device (1 available)
โอเค แบบนี้ถือว่าติดตั้งด้วยความเรียบร้อยดี จากนั้นเราไปสร้างโปรเจคกันฮะ
สร้างโปรเจค Flutter และ build บน AVD
สร้างโฟลเดอร์ แล้วเข้า path ไปที่โฟลเดอร์นั้น จากนั้นใช้คำสั่ง
flutter create <project_name>
ในที่นี่ เราใช้ชื่อโปรเจคว่า mybasicapp นะ
รอจนการสร้างไฟล์ต่างๆสำเร็จเสร็จสิ้น จนเห็นข้อความขึ้นมาแบบนี้
Running "flutter pub get" in mybasicapp...                          2.6s
Wrote 71 files.

All done!
[✓] Flutter: is fully installed. (Channel stable, 1.22.5, on Microsoft Windows [Version 10.0.18363.1316], locale th-TH)
[✓] Android toolchain - develop for Android devices: is fully installed. (Android SDK version 30.0.3)
[!] Android Studio: is partially installed; more components are available. (version 4.1.0)
[✓] VS Code: is fully installed. (version 1.52.1)
[✓] Connected device: is fully installed. (1 available)

Run "flutter doctor" for information about installing additional components.

In order to run your application, type:

  $ cd mybasicapp
  $ flutter run

Your application code is in mybasicapp\lib\main.dart.
กดเข้าไปดูไฟล์ที่สร้าง ผ่าน VS Code
จากนั้น กด Shift + Ctrl + P เพื่อใส่คำสั่ง เลือก Flutter: Launch Emulator
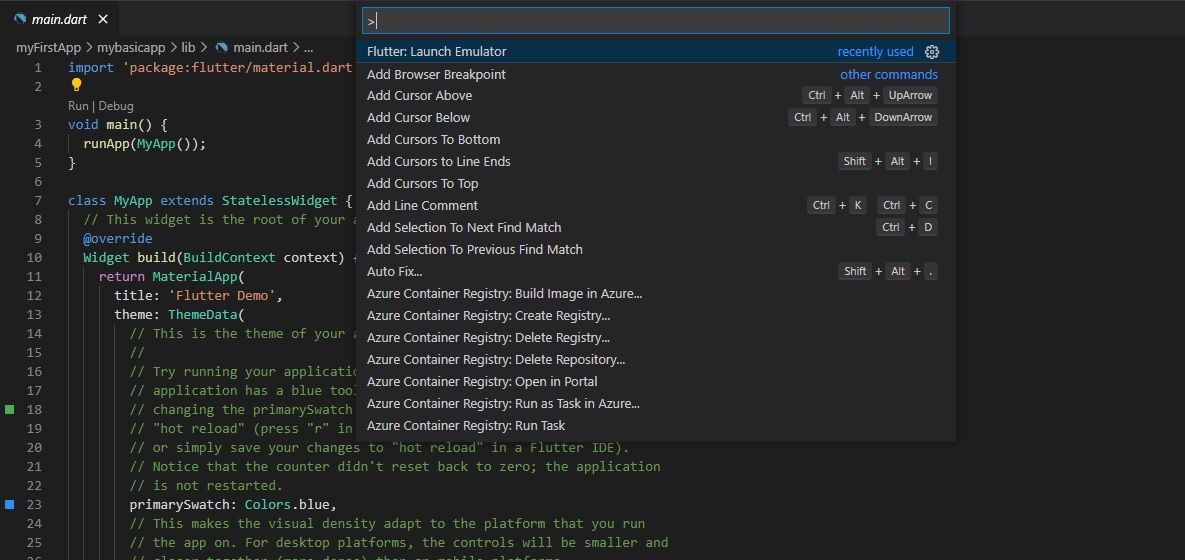
จะมี list ให้เลือก Emulator เราก็เลือกอันแรก เพราะสร้างไว้แค่เดียว

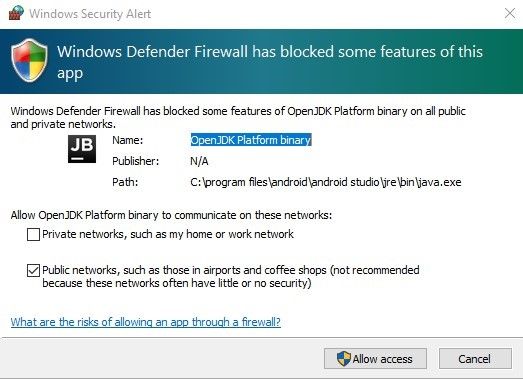
จากนั้น เครื่องจะทำการเชื่อมต่อโปรเจคกับ Emulator ให้ อาจจะมีหน้าต่าง Security Alert ขึ้นแบบนี้สำหรับการใช้งานครั้งแรก ให้กด Allow access ไป
เมื่อเชื่อมต่อเสร็จแล้ว ให้กด F5 เพื่อเริ่ม build แอพ บนเครื่องจำลอง
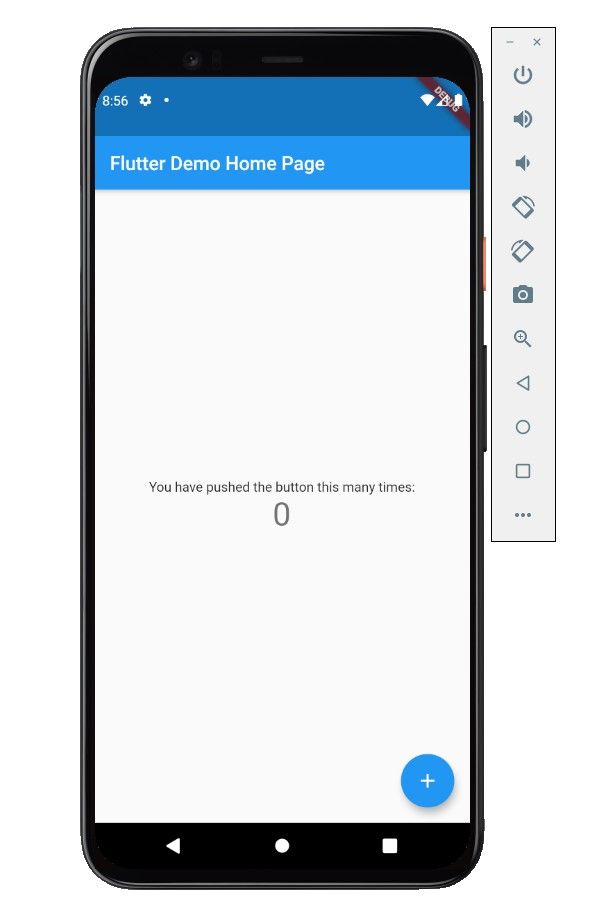
รอจนเสร็จจะได้แอพ Flutter บนเครื่องแล้วเรียบร้อย
จบการติดตั้งไปจนถึงสร้างแอพ Flutter ครั้งแรก ต่อไปเราจะเริ่มสร้างแอพขึ้นมาเป็นรูปแบบไหน ก็ทำได้ โดยการแก้ไข Default App ให้เป็นแบบที่เราต้องการ ซึ่งเราจะเห็นว่า พื้นฐานโค้ดของแอพใช้ภาษา Dart เนอะ ดังนั้น จึงควรรู้พื้นฐานภาษาก่อนจะไปเริ่มทำแอพนะฮะ แล้วพบกันบทความหน้า
Reference